Christmas  

 The front corner.

 Christmas  Desserts

      Gingerbread 

The side view. 


House

The back corner.

This is a fun activity for Christmas at your house. It is actually very easy to do if you buy a gingerbread kit there are instructions in the box to show how to assemble the house. Decorate the house how ever you would like and have lots of fun.

 Fun Candy Cane Cupcakes

 Step 7: If you are going to make your own icing sugar then prepare it while the cupcakes are in the fridge. If you are using bought icing sugar then start  putting the icing in a piping bag. Take the piping bag and turn half of it over your hand and put the icing in. Turn the bag back around and twist the end of the bag so the icing doesn't come out the wrong side. 

Step 8: Chose a piping tip that looks like a star and connect it to your piping bag. Pipe the icing in a circle and when you get all the way around you then go on to of the icing to make  tower. 
Step 9: sprinkle the sanding sugar on each cupcake and place a mini candy cane on top of the icing and enjoy your cupcakes!

These cupcakes are easy to make all you need is the following:
cupcake trays, cupcake liner (or margarine), cake mix (or your own cupcake recipe), icing, Piping bag, sanding sugar, candy canes
.
Step 1: Put your cupcake liners in the tray or if you are using margarine butter the tray where you will be putting your cake mix in.
Step 2: prepare your cake mix or recipe and star preheating your oven, (depends on what oven you have).
Step 3: Pore your cake mix into the cupcake liners or just the buttered tray about half way full you can go a bit over half if you wish.
Step 4: Put your cupcakes in your oven and check on them every once in a while. if you are making vanilla cupcakes they should turn a golden color when they are done. If you are making chocolate cupcakes then they should be a  firm brown color but not dark brown because then they are burnt.
Step 5: Take your cupcakes out of the oven when they are done and let them cool off. Once they are down to a warm temperature you can put them in the fridge to make them firm so it is easier to ice them.
Step 6: After your cupcakes are firmed up you can take them out of the fridge.

The Present:

   Choose a color you like and mold a 3D square. Cut a strip of fondant that is a different color and lay it around the present like you would see on a normal present. Make a bow by making two loops and two strips. Glue everything on with water and you are done.

The Bow: 

   Make a block, this will be the center of the bow. You can put lines at the sides if you want with your serrated knife. Next you cut two big fat strips (not to fat) and lay them around the block, do that when you look from the top it looks like a rain drop. You can fold a line on the front of each side of each loop. Glue everything on separately and assemble the pieces on the cupcake, it is easier.

Rudolph:

   Cut an oval shape out of brown fondant then at the long sides of the oval cut semi circles. Don't make the head to big so that the antlers will still fit on the cupcake. After it is the  right size glue the head on. Next roll the red nose and glue it on with water. Make some ears and glue them on. Roll the antlers out of black fondant. First make two line that go up a bit wavy on each side of the head . Then make four short lines that go on either side of the long strip. see the picture for guidance. Make two white circles for eyes and two black ones that are smaller then the white ones. Put the black circles on top of the white circles. Glue those on too and you are done. 

Santa:

   Make sure that your first layer is peach colored because it s going to be Santa's face. Then cut a red equilateral triangle out and place it up till the tip is hanging over the cupcake. next take the tip and put it back on the cupcake so that it looks like at hat that curls around to the front. See picture for guidance. Next roll a little whit ball of fondant and put it at the top of the hat which is curled around to the side. Also roll a long piece of white fondant into a worm shape and place it at the bottom of the hat. Then out of white fondant also cut the shape of a moon when it is like just the edge of an oval. See picture for guidance. Glue it on with water at the bottom edge of the cupcake for a beard. Same with the other white stuff we made before, glue it on. Next roll some small eyes and put them underneath the hat. Glue them on. After that make a nose and place it in the middle of the face and glue it on. Cut some small isosceles triangles and glue them beside the nose on either side to make the mustache. Lat but not least make a mouth and glue it on.

   We hope you have fun making these cupcakes, good luck.    

Fondant Christmas Cupcakes

   You will need: Different colored fondant pieces, Cupcakes, water. a serrated knife, icing, and Crisco. 

Step 1: 

   Take your cupcakes which you can prepare before hand, or buy them. If you made your cupcakes then put your icing on them. If you bought them and there is icing already on it then you will not need icing.

Step 2: 

   Roll out the color of fondant you would like and use a pastry cutter or serrated knife to cut a circle out. Do this for all your cupcakes and you can alternate colors if you like.

Step 3: 

   Place your circles on your iced cupcakes and make sure the cupcake is covered so you can't see the icing. it is just there for taste and glue to hold the fondant.

Step 4: 

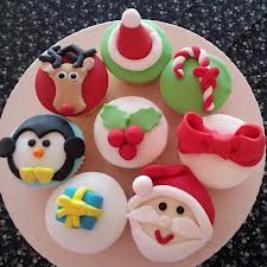
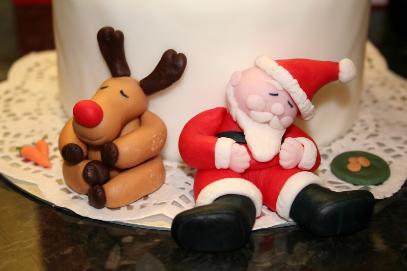
   Decide what you want to put on your cupcake as your topper. In the picture it shows a reindeer (Rudolph), Santa, Santa's hat, a candy cane, a bow, a present, a penguin, and some hollies. You could do anything you like.

Step 5:  

   Cut the shapes you need for your topper, for ex. The holly leaves, roll out a circle, and take a serrated knife and cut semi circles at the sides to make holly leaves. You could also mold things with your hands, the hollies you could take a piece and roll a little ball, and you have a holly.

Step 6: 

   Use the water to stick the things on your cupcake the fondant will stick to fondant when it is wet. Be careful though it gets very sticky so make sure you don't use too much water.

Tips: 

   If you want to know how to make the others things then i will tell you.

The Penguin: 

   You will need the first layer that you put on at step 2 to be white. Take black and cut a circle out a bit bigger then the cupcake cut out a heart shape in the middle of the black circle. Cut off the end that is hanging over the cupcake. Cut small circles for the eyes and bigger ones for the hands. Mold a 3D triangle for the beak, and mold two 3D triangles and make it be an isosceles triangle. At the end take your knife and cut zig zags for the toes. Assemble all your pieces using water so it will stick.

The Hat:

   It doesn't matter what color you chose for your first layer in step 2, take the color of hat you like mold it into a cone shape. Next roll a white ball and stick it on the top of the hat. Roll a line of white fondant so it looks like a worm. Wrap it around the bottom of the hat and stick it on using water.

The Candy Cane:

   Choose the colors you want it dose not matter which one. Roll two lines of different contrasting colors of fondant. Wrap them around each other till the fondant is all rolled up. If there is more of one color at the end like more white just cut it off. Then place it into a candy cane shape on the cupcake. Don't glue it yet first see if it fits. Then take it off again and roll another piece of fondant out in a line. Make a bow around the candy cane. Put water on your cupcake to stick on the candy cane, and you are done.


 Need Help ???

Here is a video that will help you with piping for any cakes you might want to do or any cupcake things. Enjoy and have fun!


This free website was made using Yola.

No HTML skills required. Build your website in minutes.

Go to www.yola.com and sign up today!

Make a free website with Yola